Billing Process of Projects with Contracts | Oracle ERP Cloud
Last Updated On January 6, 2026
Introduction
Oracle Project Contract Billing in Oracle ERP Cloud allows you to create receivables, invoices and helps to manage project costing. It provides an effective Cost Management solution for every kind of project and activity within an organization. Oracle Project Contract Billing also delivers the ability to simplify client invoicing, which in turn improves business cash flow and measures the performance and profitability of contract projects.
Overview of Oracle Project Contract Billing | In Oracle ERP Cloud
- During the creation of an Employee, projects are created in Oracle Projects, either system generated or manually for the respective employee.
- Each of the projects is tagged to a contract. Keep in mind that each contract can have several projects.
- During invoice creation, billing is processed for all the projects for that particular duration.
Pre-requisites
- Project and their respective contracts should be tagged to each other.
- Bill plan, invoice formats, tag registrations, currency conversions, and all the required configurations must be set up at both Project and contract levels.
- Contracts must be tagged with corresponding operating units and AR customers.
- Prepare the necessary data for project costs.
Steps to Create Receivables Invoices using Contract:
Here is the step-by-step process to build receivable invoices using a contract in Oracle ERP Cloud with the help of Oracle Project Contract Billing.
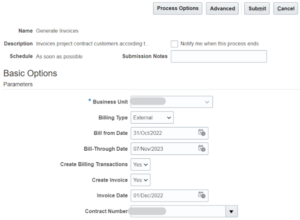
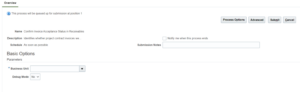
Step 1: Generate Invoice using Generate Invoices Process
- Navigation – Navigator >> Scheduled Process >> Generate Invoices
- Select the duration of the invoice with – Bill from and Bill through dates.
- Select the Contract number which has to be invoiced.
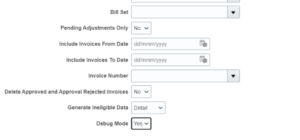
- Limitations of invoices can be achieved with the help of other parameters.
- To know about the invoice generation errors, select ‘Generate Ineligible data’ as ‘Detail’ and ‘Debug mode’ as ‘Yes‘.
- Click on submit and stay paused until the process gets accomplished.
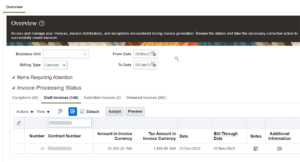
Step 2: Check the Generated Invoice in the Contract Invoices
- Navigation – Navigator >> Contract Management >> Invoices
- Search for the contract number in the dashboard, in the draft tab
- Select the generated draft invoice and click Submit
Step 3: Approve and Release the Invoice
- Once submitted switch to the submitted invoice tab.
- Select the invoice and click Approve
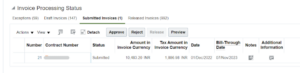
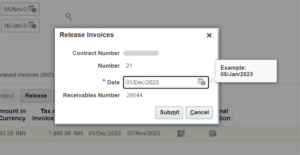
- Once the invoice status is ‘Approved’ choose the invoice and click Release

- It will take us to the respective invoice receivables number tab.
- Click Submit.
Step 4: Transfer and accept the invoice
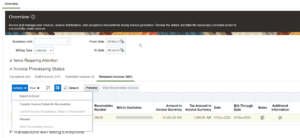
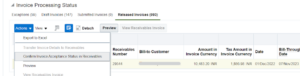
- Once the invoice is released, switch to the ‘Released invoices’ tab.
- Select the invoice and click on Actions.
- From the actions drop-down, click Transfer Invoice Details to Receivables.
- For any exceptions in the invoice, review the invoice in the ‘Exceptions’ tab.
- When there are no Exceptions, the invoice status will move to ‘Transferred’ status.
- Once the invoice is moved to transferred status, select the invoice and click on Confirm Invoice Acceptance Status in Receivables.
- It will navigate to the ‘Confirm Invoice Acceptance Status in Receivables’ process. Select the appropriate Business unit and click ‘Yes’ on debug mode, if details are required.
- Click on submit.
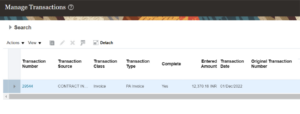
Step 5: Check Receivables Invoice
- Navigate to the receivables invoice, to verify the imported invoice.
- Navigation: Navigator >> Receivables >> Billing >> Invoices >> Task >> Manage invoices >> Query the invoice with the corresponding receivables number.
Points to consider | Oracle Project Contract Billing in Oracle ERP Cloud
- The ‘Import Autoinvoice’ process can be run to transfer bulk invoices to Receivables
- Navigation: Navigator >> Tools >> Scheduled process >> Import Autoinvoice >> Add the necessary inputs and submit
Business Benefits of Project Contract Invoices:
- Manual creation of invoices can be avoided.
- The process is automated and consumes less time.
- Reduces the risk with enterprise standards, policies that govern their use, and flexible tools.
- Changes in Contract plans and Invoice configurations are done with ease.
Author: Manojkrishnan KS, Oracle ERP Cloud Consultant