Bulk Import of Lookup Types/Codes Using File Based Loader in HCM Cloud

Entering all the values of the lookup type and code into the application manually will consume a significant effort during data migration. It may result in wrong data entry which could lead to other application issues. Apart from this, the data entry activity has to be repeated in other instances of applications.
In Oracle fusion’s File import and export feature provides (file import and export in Oracle Fusion) a faster way of loading the lookup type and codes which helps consultants overcome the issues that come with manual data entry.
This feature not only expedites the loading process but also ensures data accuracy and uniformity. By mitigating the risks associated with manual entry, such as errors and redundancy, this approach enhances the efficiency of data migration. This efficiency, in turn, empowers consultants to allocate more time to strategic responsibilities, contributing to a seamless implementation of Oracle HCM Cloud.
Here are the steps detailing how to import lookup values in Oracle Fusion:
Step 1:
- Prepare the Import file with Lookup data.
- The below table contains the information that you should include in your import files for Lookup Types and Lookup Codes.
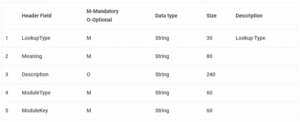
Lookup Type – Header Fields and Descriptions
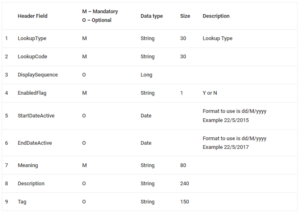
Lookup Codes – Header Fields and Descriptions
- While creating the import file use this pipe ‘|’ as your delimiter and save this file in .csv file extension.
Sample Lookup Type File
LookupType|Meaning|Description|ModuleKey|ModuleType
POC_TYPE| POC_TYPE_MEANING| POC_LTYPE_DESC|PER|APPLICATION
Sample Lookup Code File
LookupType|LookupCode|DisplaySequence|EnabledFlag|StartDateActive|EndDateActive|Meaning|Description|Tag
POC_TYPE|POC_TYPE_CODE|1|Y|04/07/2022|31/12/4712|POC_TYPE_CODE_MEANING|POC_TYPE_CODE _DESC|CODE _TAG
Step 2:
- Navigation to upload the files to the UCM Server
- Navigation: Navigator >> Tools >> File Import and Export
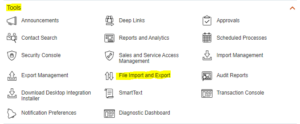
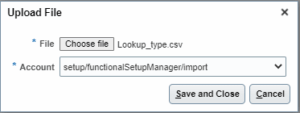
- Click on the Upload icon.
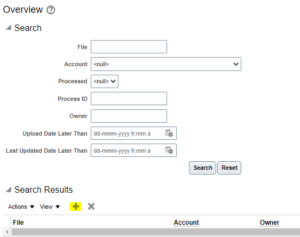
- Browse the prepared import file to upload then select ‘setup/functionalSetupManger/import’ from the Account drop-down list. Click on save and close.
Step 3:
- Import the uploaded data into fusion as lookup data.
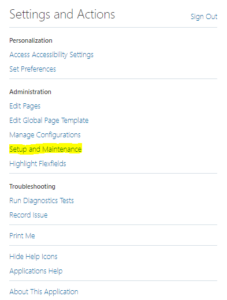
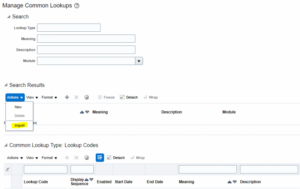
- Go to Setup and Maintenance.
- Click on Search Results.
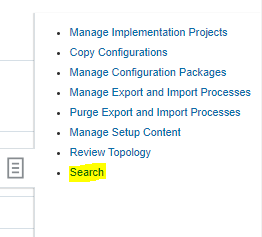
- Search for Manage common lookups and Select import from the Actions menu.
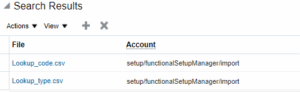
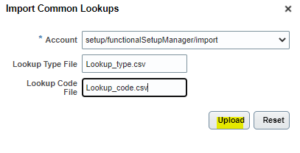
- In Import Standard Lookups, select the Account where you imported the files (setup/functionalSetupManger/import).
- Give the Full name of the file to be imported, including the csv extension (For example Lookup_type.csv) and click on upload.
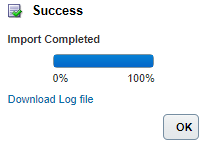
- You can view the progress of the process and you will able to download the process log file when the process has completed.
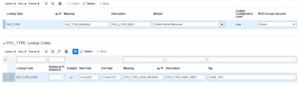
- Navigate to the lookup field in the user interface to verify that your lookup values imported as expected.
Points to remember:
Create separate files for Lookup Types and Lookup Codes. Files should be of UTF-8 encoding (“UTF-8 without BOM”. Notepad ++ had the feature to convert the encoding)
Business Benefits:
- Time and Effort Saving: Minimized effort in data migration.
- Repetition Ease: Facilitated deployment across instances.
- Speed and Accuracy: Swift, error-free data migration.
The Bottom Line:
Oracle Fusion’s File Based Loader (FBL) streamlines bulk import of lookup types and codes in HCM Cloud, reducing errors tied to manual entry during migration. Consultants follow steps to prep files, upload to UCM Server, ensuring data accuracy and consistency across instances. FBL adoption empowers efficient data migration, maintaining HCM Cloud integrity.
Author: Mohamed Thowfik Rahman, Oracle Cloud Consultant | Kovaion