Creating Expenses with Excel Made Easy
Introduction
If you’ve ever spent hours manually entering expense data row by row into Oracle Fusion Cloud, there’s a better way. ADF Desktop Integration (ADFdi) transforms Microsoft Excel into a live, intelligent front-end for Oracle Fusion — letting you manage bulk data at spreadsheet speed, without ever sacrificing the validation and security of the enterprise system behind it.
What Exactly is ADF?
Oracle ADF (Application Development Framework) is the core Java EE framework that powers the Oracle Fusion Cloud user interface. Every screen you interact with in Fusion — from Person Management to Expense Entry — is built on ADF. It follows the classic Model-View-Controller (MVC) architecture, where ADF Faces handles what you see, and the Model layer manages how data flows between the database and the UI.
When we talk about ADF in the context of Excel, we’re specifically talking about ADF Desktop Integration, or ADFdi — a browser plugin and Excel add-in that creates a live, two-way connection between your spreadsheet and the Fusion database.
ADFdi Is Not Just an Export. It’s a Live Connection
This is the most important thing to understand. ADFdi is not a simple CSV download. When you open an ADFdi-enabled Excel file, you are essentially opening a window directly into Oracle Fusion. Every validation, every business rule, every security role you’re subject to in the web UI applies equally inside your spreadsheet.
This distinction matters enormously in practice. If you type an invalid Department Code into a cell, Excel flags it immediately — because it’s checking against the live Fusion setup data in real time. You get enterprise-grade data integrity with the comfort and flexibility of a spreadsheet.
Why Teams Use ADFdi
The primary use case is volume. When you need to upload hundreds of expense rows, update department codes across an entire organization, or manage payroll flow patterns at scale, the standard web screen simply wasn’t designed for that kind of throughput. ADFdi bridges that gap elegantly.
After you upload your data, a Status column within Excel updates in real time — showing “Insert Succeeded” for clean rows and a specific error message for any that failed. You can fix and resubmit without ever leaving the spreadsheet. It’s a remarkably efficient feedback loop.
Getting Started: Setting Up ADFdi
Before anything else, you’ll need to install the Desktop Integration Add-In. Oracle’s official setup guide can be found here:
Set up desktop integration for Excel
Step-by-Step: Creating Expense Items via ADFdi
Here’s a practical walkthrough using the Expenses module as an example.
Step 1: Open Settings in Expenses
- Navigate to Me → Expenses in Oracle Fusion. In the top-right corner, click the Settings icon.
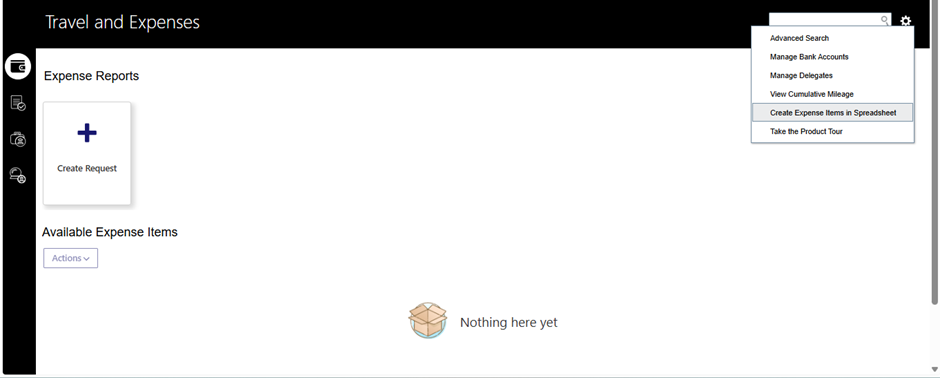
Step 2: Download the Spreadsheet
- Inside Settings, select “Create Expense Item in Spreadsheet.” An Excel file (.xlsx) will download to your local machine. Save it somewhere accessible.
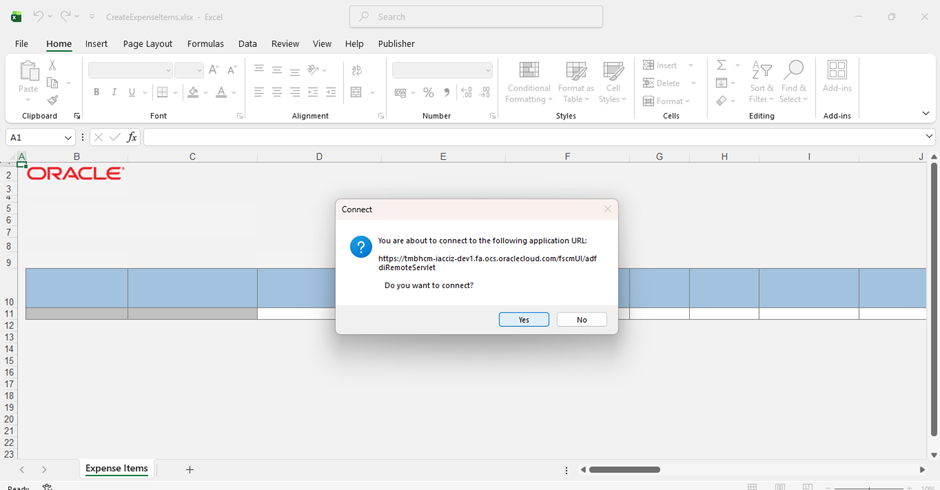
Step 3 — Connect to Fusion
- Open the Excel file. On launch, it will prompt you to connect to the Fusion application. Enter your Oracle Fusion Cloud credentials to authenticate.
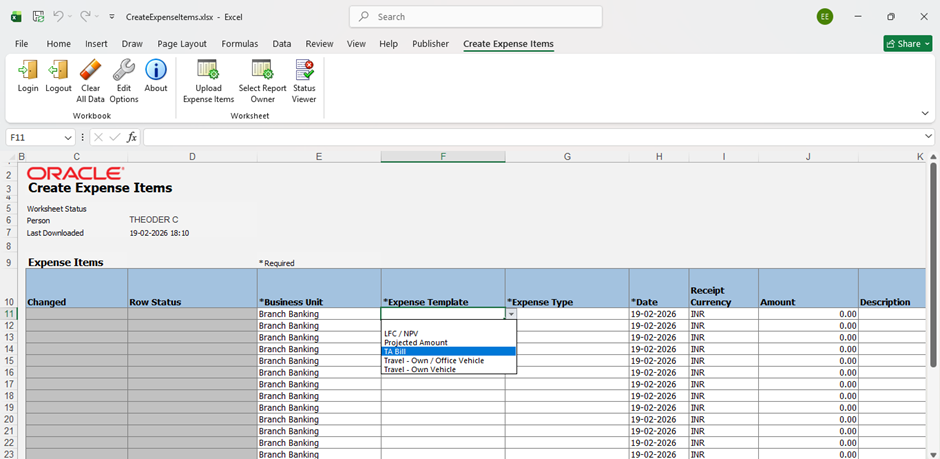
Step 4: Review Your Workspace
- Once logged in, the spreadsheet populates with your name, the last updated date, and a structured grid ready for data entry. Each row is already contextually tied to your Business Unit — the system knows who you are and where you belong.
Step 5: Fill in Expense Details
- Complete all required fields for each expense item. Hovering on the next tab reveals a dropdown to select Expense Items. From there, choose the Expense Type and Date.
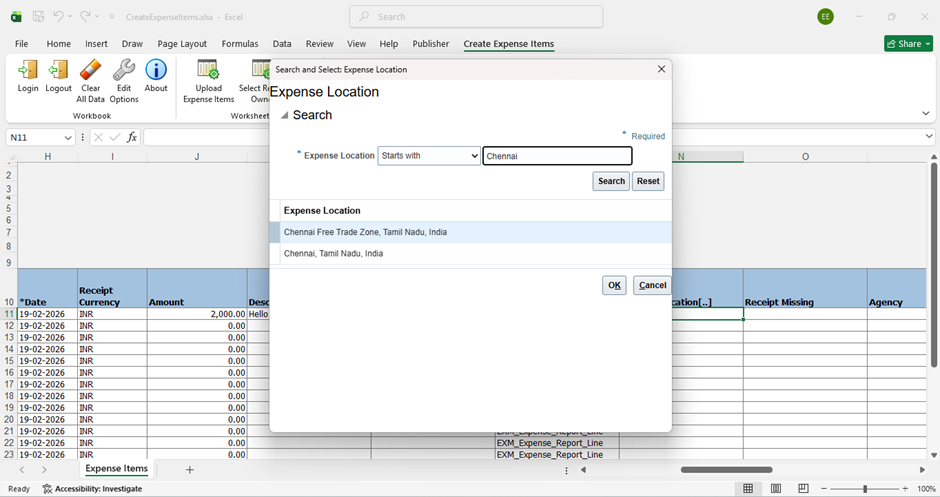
Step 6: Select a Location
- For the Location field, double-tap the cell. A pop-up window opens — identical to the one in the Fusion web UI — where you can search and select any location you need.
Step 7: Prepare to Upload
- Once all your expense rows are filled in and reviewed, you’re ready to push the data back to Fusion.

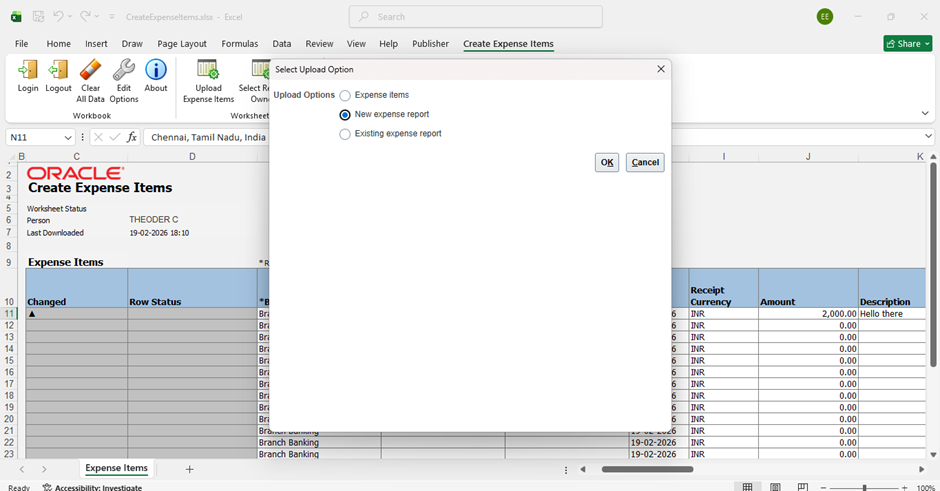
Step 8: Upload via the Ribbon
- In the Excel ribbon, click “Upload Expense Items.” A pop-up will appear with three options for how to handle the upload. Select “New Expense Report” to create a fresh report with your entries.
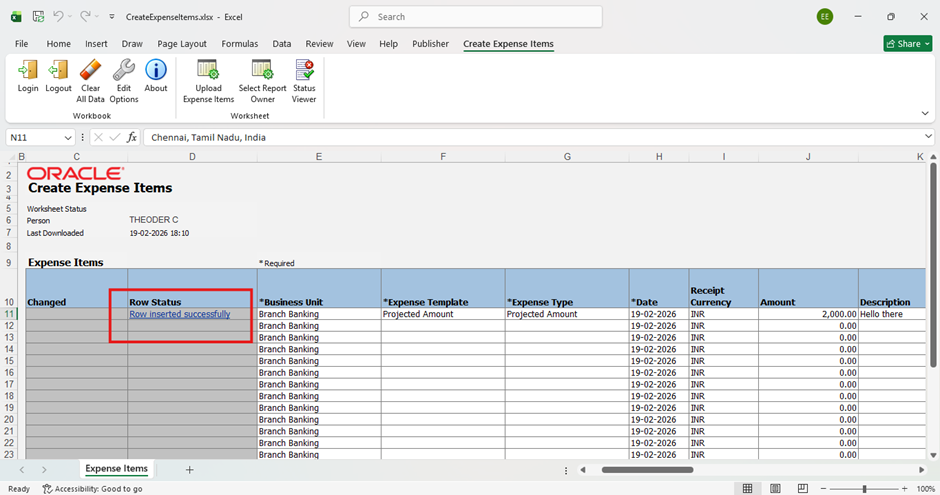
Step 9: Confirm Success
- After the upload completes, the Row Status column will display “Row Inserted Successfully” for each processed entry.
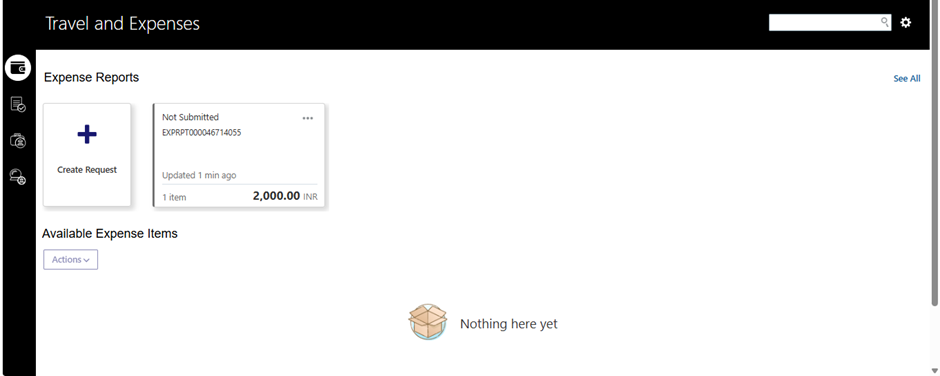
Step 10 — Back to Fusion
- Open Oracle Fusion Cloud. Your new Expense Report will be waiting. From there, you can add authorizations, attach receipts, and submit the report through the standard approval workflow.
Business Benefits
1. Increased User Productivity
Employees can create and upload expense reports using familiar spreadsheet-based tools, reducing the learning curve and enabling faster expense entry. This streamlined approach minimizes the time spent on manual data input and allows users to focus on more strategic business activities.
2. Reduced Manual Data Entry
Excel-based expense creation significantly decreases repetitive data entry tasks. By uploading multiple expense lines in a single process, organizations can reduce administrative effort, eliminate duplicate work, and improve overall operational efficiency.
3. Improved Data Accuracy
Using predefined templates and validation rules helps ensure that expense data is entered consistently and accurately before it reaches Oracle ERP. This reduces processing errors, minimizes rework, and improves the quality of financial records.
4. Faster Expense Processing
Bulk expense creation and automated uploads accelerate the expense submission and approval lifecycle. Employees receive reimbursements more quickly, while finance teams can process a higher volume of transactions with greater efficiency.
5. Enhanced Financial Visibility
Standardized expense data improves reporting accuracy and provides finance teams with better visibility into employee spending patterns. This enables more informed decision-making and supports stronger budget management practices.
6. Scalable Expense Management
As organizations grow, spreadsheet-based expense upload capabilities can efficiently handle increasing transaction volumes without significantly increasing administrative workload, making the process scalable and future-ready.
7. Better User Adoption
Leveraging a familiar tool like Excel encourages user adoption and reduces resistance to process changes. Employees can seamlessly transition to digital expense management while maintaining a user-friendly experience.
Conclusion
Creating expenses with Excel in Oracle ERP Cloud simplifies one of the most common financial processes by combining user convenience with operational efficiency. By enabling bulk expense creation, reducing manual effort, and improving data accuracy, organizations can streamline expense management while maintaining strong financial controls. As businesses continue to seek ways to enhance productivity and optimize finance operations, Excel-based expense creation offers a practical and scalable solution that delivers measurable value for both employees and finance teams.
Simplify Expense Management with Oracle ERP Solutions
Looking to streamline expense reporting and reduce manual data entry? Oracle ERP Cloud’s spreadsheet-based expense creation capabilities empower employees to submit expenses quickly while helping finance teams improve accuracy and efficiency. By automating expense-related processes, organizations can accelerate approvals, enhance financial visibility, and create a more user-friendly experience.
At Kovaion, our experienced Oracle ERP consultants help organisations implement and optimise Oracle ERP solutions that simplify expense management, automate financial workflows, and improve operational performance. From process optimisation to end-to-end Oracle ERP implementations, we deliver scalable solutions that help businesses maximise the value of their Oracle investment and drive long-term success.